

Main Scan Interface
In this section you will learn how to perform scans, interpret the results, make appropriate identifications and generate reports.
When you create a new scan, you are prompted with the interface to upload the source code you want to scan:
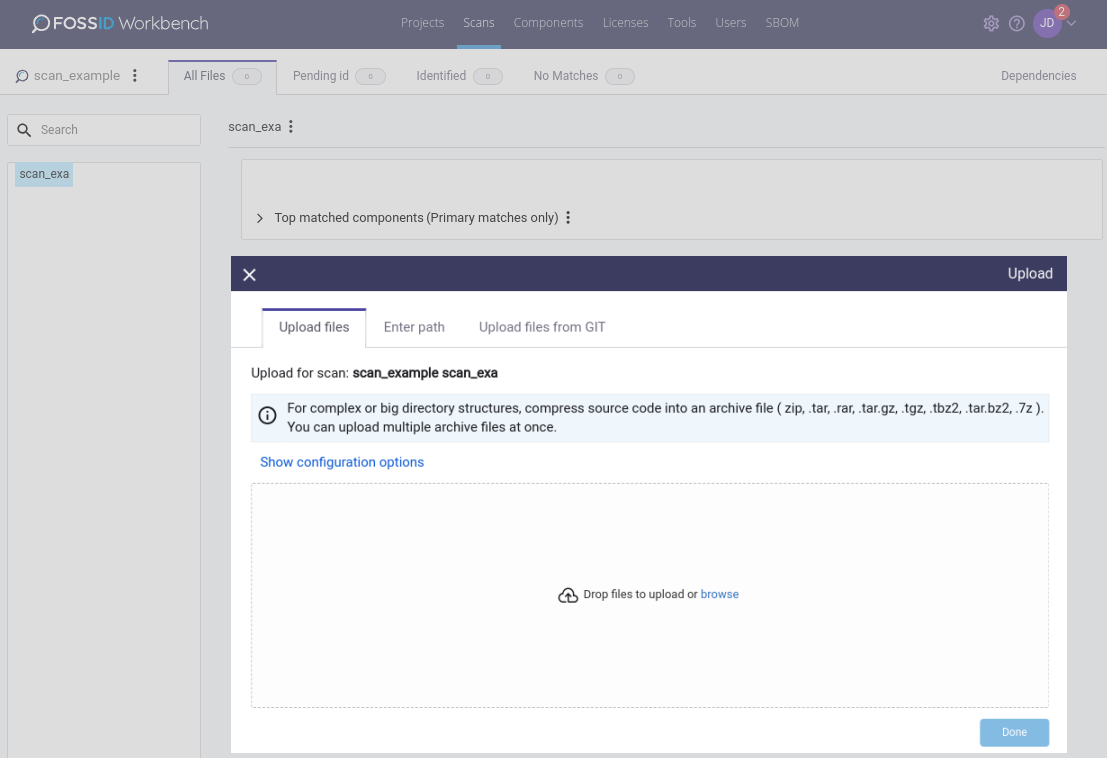
For complex or big directory structures, it is recommended to compress the source code into a package file (.zip, .tar, .rar, .tar.gz, 7z, tgz, .tar.bz2) before uploading it, so that the upload transfer is performed rapidly. Note that you can upload multiple package files if you want.
Alternatively, you can select the option Enter path from the tabs, which allows you to point to a location (that must be accessible from the server where the WebApp runs) instead of uploading the code. This is ideal if you want to scan a repository directly, as it removes the need to upload any source code. Note that this option must be enabled in fossid.conf before it will be visible:
webapp_scan_path_enable=1
Also in fossid.conf you can restrict file system paths to only access content available at specified locations. Several comma separated locations can be specified:
webapp_scan_path_prefixes="/my/path/1,/my/path/2"
Upload configuration options
Clicking the Show configuration options in the upload popup window will provide you with additional upload options.
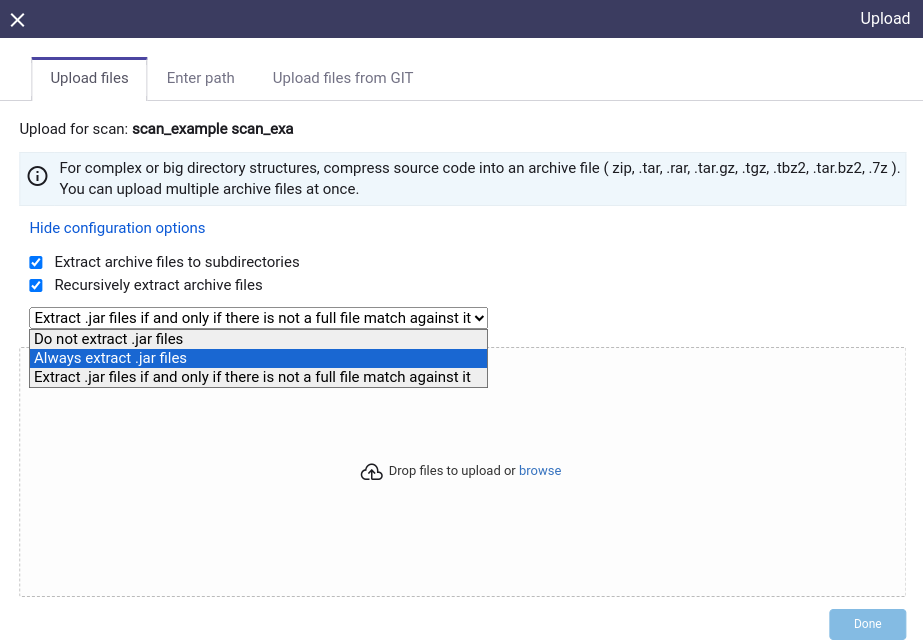
- Extract archive files to subdirectories - if checked, uploaded archive files will be extracted into subdirectories. If not checked they will be extracted into the scan root folder.
- Recursively extract archive files - if checked, the archives (such as .zip or .tar files) within other archives included in the upload will be extracted (uncompressed) until there is no archive left to be extracted.
- .jar files extraction - configure how .jar files are handled:
- Do not extract .jar files - .jar files will not be considered as archives and they will be searched for a match during the scan.
- Always extract .jar files - .jar files will not be scanned. Instead, they will be uncompressed and their content will be scanned.
- Extract .jar files if and only if there is not a full file match against it - The .jar files will be scanned and if there is no match for them, they will be uncompressed and their content will be scanned.
Please note that the state of the “Recursively extract archive files” option is only relevant when uploading a file. Changing this state will not have any effect on already uploaded files.
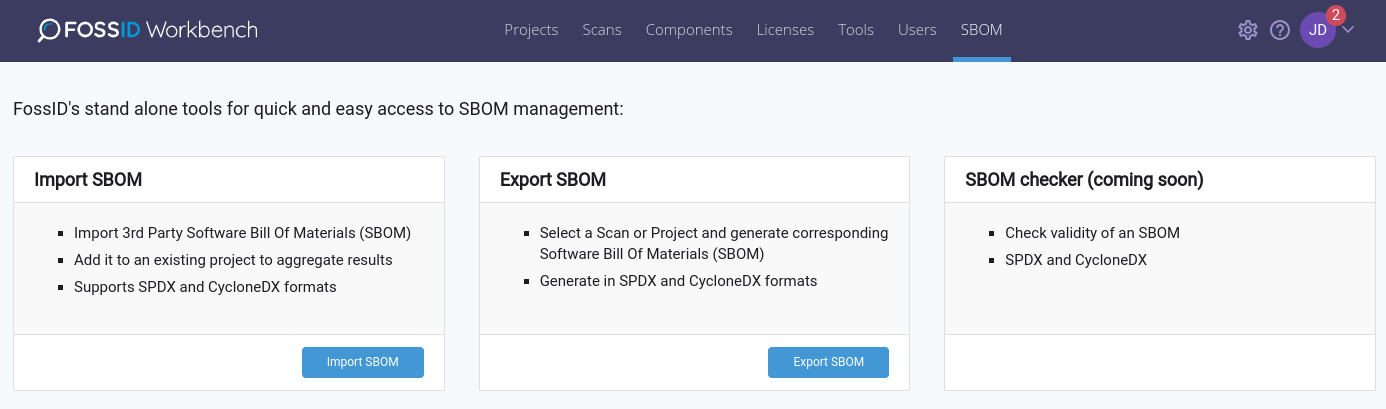
Import SBOM it is possible to create a scan from a SPDX or CycloneDX report, this option is found under SBOM menu.
This option is allowed if a user has permissions: “Scans - Create New Scans”, “Components - Create New Components” and “Licenses - Administrate licenses”
The next step is to select scan parameters before performing the scan:
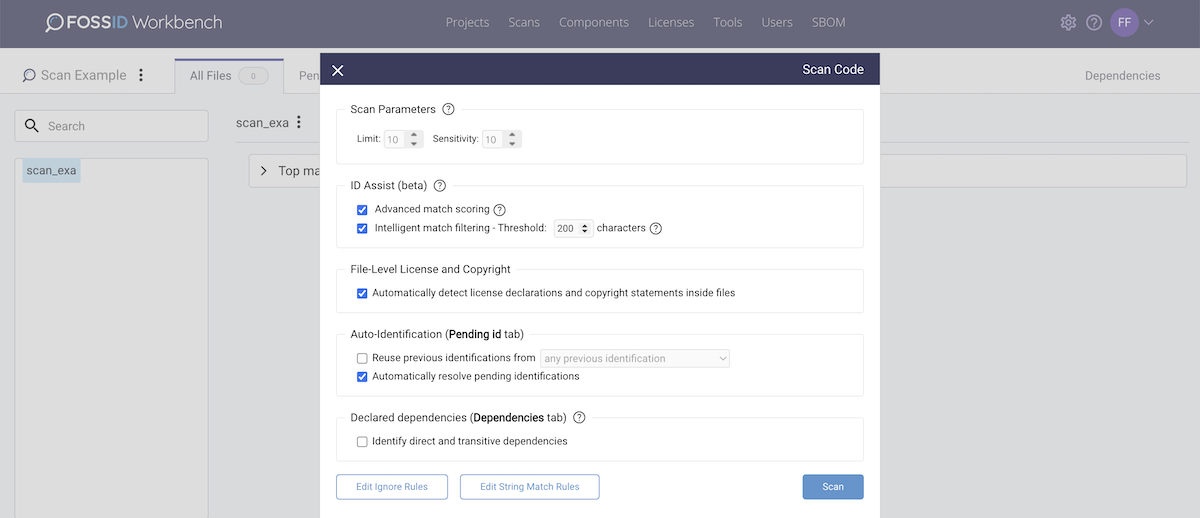
The scan parameters or configuration options include limit (number of maximum matches per file) and sensitivity (minimum number of code instructions required for a snippet match). At this stage, you can also choose to activate auto-identification options to extract license and copyright information from the scan target files as well as automatically resolving pending identifications.
Additionally, you can select different options to reuse previous identifications. Thus, previously annotated files will be automatically identified (inheriting component, license, and copyright information) and marked automatically as identified. Ignore rules allows you to exlude file-extensions and, by wildcard, specify directories and files from the scan.

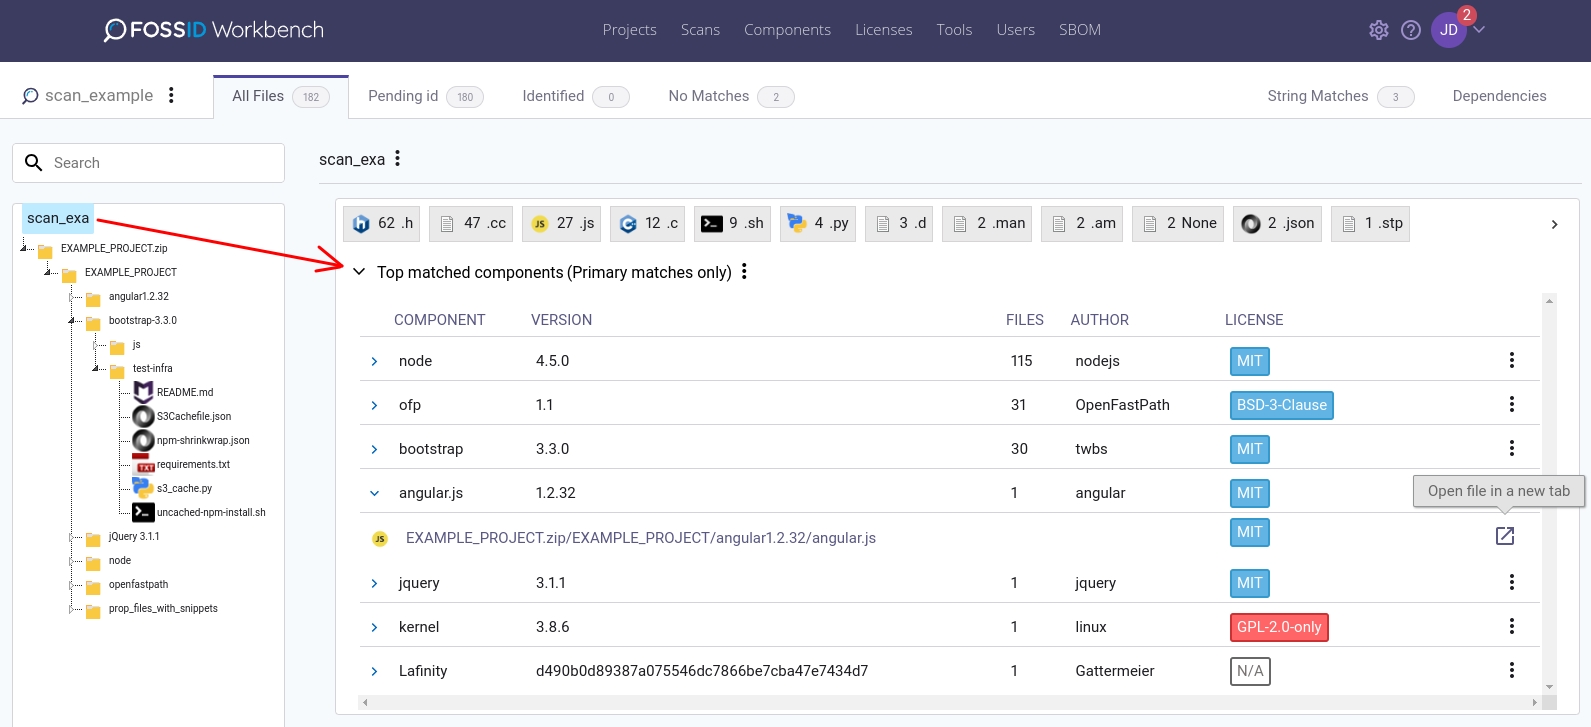
Scan interface: Once the scan is done, you are presented with the scan interface, which allows you to browse through your file structure, inspect the scan results and make the appropriate identifications.

To make this task easy for you, the scan interface provides you with four different file-tree views that you can select from the upper left corner drop down menu:
 All files view shows all the files that have been uploaded in your scan. From this view you can make identifications, mark files/folders as identified and also send files/folders back from marked as identified.
 Pending identification view displays the files that have matches to the open source community (according to the used sensitivity settings and FossID’s Knowledge Base at the time of scanning) and have not yet been cleared (marked as identified).
 Marked as identified view shows the files that have already been identified or cleared. From this view, you are able to send files/folders back from marked as identified.
 Without Matches view displays the files that do not have open source matches (according to FossID’s Knowledge Base at the time of scanning). You can mark files without matches as identified if you want to, but note that if you do so, those files will be removed from this view (to be found in marked as identified view).
Now that you understand how the scan results are organized in the scan interface, let’s look at all the actions and shortcuts available to help you operate the tool, starting with the menu options in the main bar at the top:
 Upload Code: Click here to upload additional source code to your current scan. Note that for the uploaded code to appear in your file structure, you need to perform a scan by selecting Scan Code button (and remember to un-check “delta only” option).
 Scan Code: Click here to perform a scan or see the current status of an ongoing scan. If there is a scan running in the background, this window will show the percentage of completion. Otherwise, a new scan window will open up, allowing you to set the scan configuration options and kick start a new scan.
 Look for file system changes: If using remote path as scan content source, click here to check if updates have been made at the remote location.
 Scan Log: See all log entries specific to the scan you are working on.
 Generate Report: Click here to generate reports once you have concluded the audit process. See reports section for more information.
 Generate JIRA Ticket: Select this option to generate an error report in JIRA with regards to a specific match, a single file or a whole directory.
 Generate Approval Requests: Click here to generate an approval request for all identified components
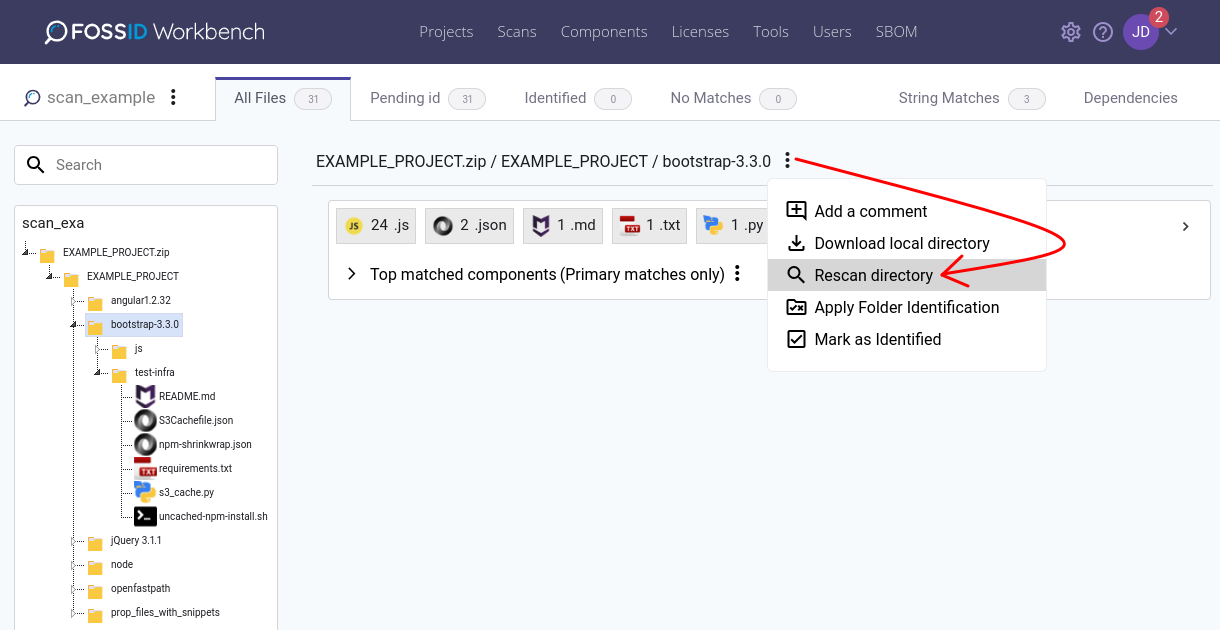
Scanning a single directory
You can also re-scan a selected directory. Once selected you will be presented with the same options as a normal scan but your selection will only affect the specified folder.
Rescanning modified files in same scan
After an initial scan of a project it is possible to reupload in the same scan the files with modifications (Ex: a new commit made in the project). When rescanning changed files with partial matches, those files will be moved back to Pending tab (remove Identified checkbox) if the matching snippets in the local file are different (different match.local_highlight.blocks[].id) from previous scan. Those partial matches which have the same matching snippets in the local file will remain marked as Identified.
Please note that if you want to leverage re uploading content in same scan, you may want to set in fossid.conf the value “always” for parameter extract_to_directory:
; Control whenever to create a directory with the same name as the archive
; Possible values:
;  - only_additional_files - Only create directories for consecutive uploads
;  - always   - Always extract to a separate directory
;  - never    - Always extract to the root directory
; This can be overridden on a per scan basis when uploading source code
;extract_to_directory=only_additional_files
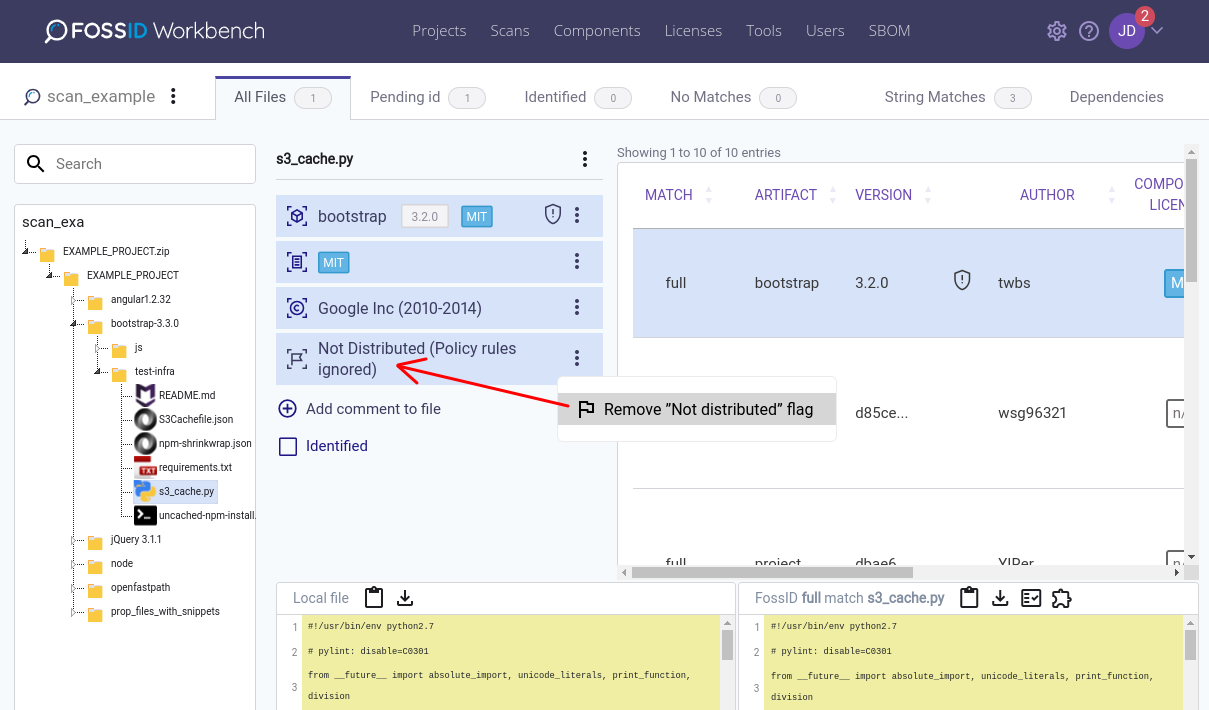
File distribution status
Optionally, files can be marked as “Not distributed”. This is simply an indication that the file is not indended to be shipped/distributed and can, for example, be used at the discretion of the auditor to mark files as not interesting from a license compliance perspective.
Automatic resolution of pending identifications
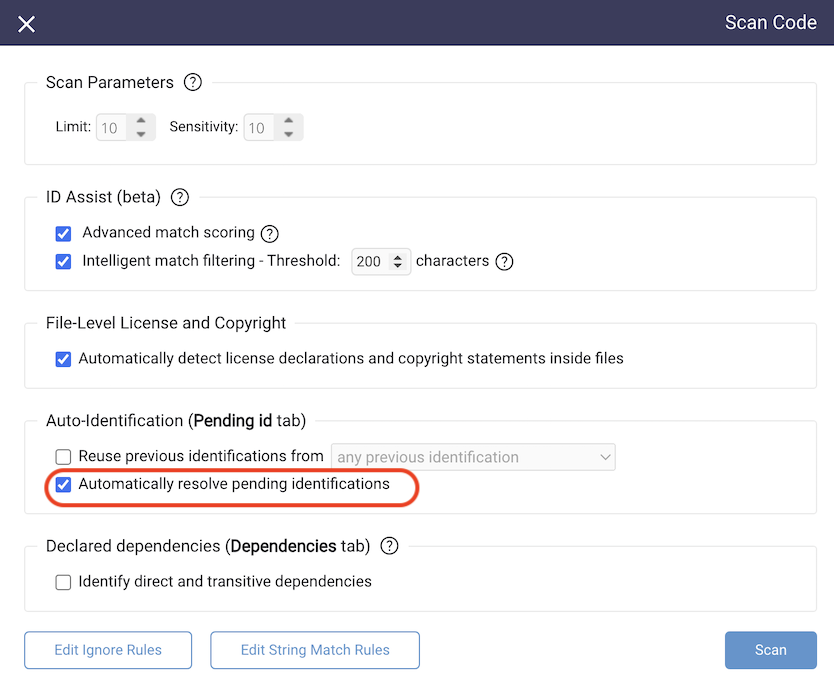
One of the more time consuming tasks when auditing source code is choosing which component matches to apply to files with pending identifications. FossID allows automatically assigning top component matches to all files with pending identifications as well as marking those files as identified without any user interaction other than enabling a scan parameter. Once the scanning is complete, you can inspect the results from the “Top match components” view. If something stands out, such as a single file identified with a component with a copyleft license in an otherwise proprietary or permissively licensed context, you can immediately focus on that file instead of first going through a number of pending identifications.
Note that the automatic resolution is entirely optional and performed as a best effort by the FossID web application. You should always carefully inspect the results before accepting them.
Interpreting the scan results
Match can have possible values:
- full - the scanned file is matching entirely a file in our KB
- partial - the scanned file is matching a snippet from a file in our KB
- ignored - the file was ignored for possible reasons: noise reduction, ignore rule added to the scan
- intake - scanned file matching entirely an intaked component. See Component intake.
- none - no match was found for the file
- failed - an error has happened
Artifact and version represent the name and version of the Open Source component/package where the match was found.
Author is the publisher of the code.
Component License refers to the license of the component/package, File License refers to the license of the matched file.
File and size represent the path and size of the file inside the component/package.
URL contains the links to the matched file and component/package found in a public repository (e.g. GitHub)
Hits value “all” means complete match. For Hits values like “54 (87.1%)”, 54 is the size of the snippet in the local file, and 87.1% is the coverage in percent of the snippet in the local file.